6/30/11

A New Favorite

It may seem like HomeAwaits is being overtaken by the kitchen BUT I hope you know that I think the kitchen is the heart of the home. I'm super excited to share a little piece of heaven with you. Last weekend I came across these on pinterest.


I decided to make them for a get together with  friends. Let's just say they were so stinkin' good I've decided to make them again as we head up to Wisconsin for the Fourth of July weekend. Here's the recipe from Baked Perfection, so easy!


Peanut Butter Cup Brownies
Recipe adapted from Nestle’s Very Best Baking
Makes 40 brownies as adapted

1 box of your favorite brownie mix
1/2 cup peanut butter chips
1/2 cup semi-sweet chocolate chips
3/4 cup creamy peanut butter

Preheat oven to 350 degrees. Spray or grease 40 mini-muffin cups.

Prepare boxed brownie mix as directed. Spoon batter evenly into muffin cups (about 1 heaping teaspoon). Bake for 13-15 minutes or until top is set and a toothpick inserted into center comes out slightly wet. After brownies are out of the oven, wait for centers to fall. This will happen upon cooling. If not then tap the centers with the back of a teaspoon to make a hole for the peanut butter.

Place peanut butter in a small microwave-safe bowl. Microwave on high for 45 seconds then stir. While brownies are still warm spoon about half a teaspoon of peanut butter into the center of each brownie. Top with semi-sweet chocolate chips and peanut butter chips. Cool completely in pan.

Oh my gosh, these are soooo good! Just perfect! Let's just see how many I can eat this weekend! I'm making 2 batches for 14+ people. I hope it's enough! :)

6/28/11

Grill Master


Now that we're spending lots of time grilling on our 2nd floor apartment patio, I'm trying to get more creative with what we put on our charcoal baby. I was quite satisfied when my Whole Foods newsletter arrived in my inbox. I thought this guide to grilling was quite helpful. Make sure to take a look at the tab for grilling vegetables and fruits. Good stuff! 

Happy grilling!


6/27/11

Another Reason I Love Pinterest


Another reason why I love Pinterest...


You know, I'm kinda into the house decorating thing. My eye is easily caught on such beauties. Remember when I told you about the awesome web site, Pinterest? If not, see here. It's still my best friend. It's been quite entertaining to see so many of you now "pinning". 


I learned something today. I love looking at peoples home boards on Pinterest. I can get an idea in about 10 seconds of your decorating style. How cool is that! It's been fun to check you out and see what strikes you as awesome. 


Today, it's a big mighty THANKS to all my lovely readers! You are awesome! Happy pinning!

6/24/11

Clean Shower Curtains 101


If you're not lucky enough to have the luxurious shower areas above, please read on.


Shower curtains. What do you think of?


It's usually something I pay no attention to and that's a problem! It seems that my plastic shower liner can get quite gross over time. Here are some helpful facts I found, thanks to this site.

  • after showering, keep shower curtain closed to prevent mold growing between the folds
  • always ventilate the shower area so moisture can escape
  • clean the curtain once a month.....I failed!
  • clean fabric shower curtains in the washer, a cup of bleach will kill mold
  • clean plastic shower curtains with cleaner and a sponge (seems difficult to me)
  • clean plastic shower curtains in the washer too! Add 2 towels for friction.... Huh, must try!
  • replace the curtain after 1 year
  • any sight of mold, throw away.....Ooops!
I'm a very spoiled wife. The Mr. is usually The King of Shower Cleaning around here so I usually ignore this area. Soft Scrub or Scrubbing Bubbles is our cleaner of choice. Thanks to a serious deep clean recently, The Mr. was able to bleach the bajeebies out of our shower. I made sure to give him The Best Husband Award that day! What's your favorite product or method for cleaning your shower curtain? Please share!

6/22/11

Veggie Cheat Sheet

I am a different girl than I used to be. Duh!


Many things have changed through the years but the most amazing and the one I'm most proud of are my changing taste buds. Most people know that I don't eat salad. Yeah, weird, I know. I don't eat most veggies either. Well, I'm proud to announce that I know can handle potatoes, corn, green beans, asparagus, zucchini squash, mushrooms, peppers, spinach and sometimes a little brocoli. I bolded the new guys. This is quite crazy to me. I thank my husband and mother-in-law for helping me grow. Love it!


My favorite veggie to make on a weeknight is zucchini squash. I just slice them up, boil them, drain, and add salt, pepper, and parmesan. Speaking of, one night, that's all I had for dinner. I thought I deserved the Good Eater's Club Award that night for being that hardcore! 


While on Pinterest, (remember when I told you it's a must try?!) I came across a cooking vegetable cheat sheet. Find it here. Print it off and put it inside a kitchen cabinet door close to your stove. Hope it helps!

6/21/11

Antique Shadow Boxes

The other week I surprised  a close friend with a trip to get frozen yogurt and do a little antiquing for her birthday.  We had so much fun together! I was excited to buy her her first flower frog, remember when I tried to convince YOU to get one of these?


In one of the stores, I was seeing a lot of brown antique shadowboxes. I know that my mom uses them in her decor as backdrops or wall displays. I wanted to learn more about them but I didn't come across much while googling.


Here's the juicy part anyway, making a display lovely...


image (Please look past the dresser.)


I found this picture I took at Christmas of my mom's display. Sorry for the glare.

These work great as focal points above a dresser or hutch. Make sure to add a few feminine pieces with it so it doesn't overwhelm itself in heavy, masculine brown. A glass vase, fresh flowers, or pretty plate may help. Differing heights in objects also makes it more appealing to the eye.

Ta-dah! Now you have something to look for while antiquing.

6/20/11

Making Strawberry Jam


I live in the city but grew up in the country. People are always surprised when they learn or see my home town. It cracks me up to hear their responses. They have a hard time believing I graduated with 45 other students, lived between corn fields, and had to wait on trains almost every day. I loved it.


Growing up in the country, (well I was in a little town) made for some good eating. I was accustomed to summer and the fresh produce my grandparents and parents grew. I can remember cutting off green beans until I thought my hand would fall off. I remember making homemade pasta and hanging it from chandeliers in my grandma's house to dry. I can easily recall the day my grandma made pickles, worst smell ever! Making applesauce was a blast with the cousins. Now that I'm "on my own" and learning how to make a house a home, I desire to learn these skills. (I sure didn't use too!) It will be a slow process but an exciting one. The last two years the Mr. and I have made homemade applesauce. We have a blast! This year I wanted to attempt homemade strawberry jam. 


My friend, Brienn and I went to Spencer Farms to pick our own berries.With $1.95 a pound, I couldn't help but pick over 6 lbs. of berries. We came home and made 12 half pints of jam. Not too much, just enough to keep in the freezer. Of course, we had tons of berries left over which we used for strawberry shortcake and pies. Yum, my two favorites!


We realized the process wasn't that hard. I think most people could handle it. What do you have to loose?


Just in case you were wondering, this is how we made our jam. Sorry, I don't have step-by-step pictures, we were enjoying it too much.


Recipe:
2 cups crushed strawberries
4 cups sugar
1 box Suregel (pectin)


I about fell over when I saw how much sugar goes into this recipe. Oh well!


1. Mix crushed berries with pectin in saucepan.
2. Turn on stove to high. Once it turns to a rapid boil, stir in sugar.
3. When it returns to a full boil set timer for 1 min. Stir constantly.
4. Remove from burner. Scrape off any foam.
5. Fill jars quickly.
6. Seal jars by boiling them in about 2 inches of hot water for about 10 minutes.
7. If lids pop, they did not seal properly. 


If you're really interested, here's something that we used. Warning...it's a little wordy. 


My encouragement to you is to try something new this season. You'll be proud of yourself.


And one last personal thing. Today I'm celebrating two years of marriage! Yipee! Instead of all the pretty, perfectly edited pics I thought I would share some funny ones.


 Ha, wasn't the perfect day for outdoor pictures.

 Yes, Greg the groomsman passed out during the prayer.

Loved my cousins, Rob and Brian for collecting moola for our honeymoon. Such a fun surprise!

We're loving life!

6/17/11

A Gift for a Little One


We are so blessed to have friends with little ones. Recently, we celebrated a first birthday with our special friend, Ellie. I knew she would be getting lots of goodies, because they always do at that age. Of course, I wanted to make something special for her. Kinda like when I personalized this gift for another little friend.


Talk about the best birthday suit ever!


I am in the process of creating/sewing quiet time books for children. (The Mr. thinks it might take me 10+ years, it just might.) They are very time consuming. Thanks to Etsy, I've come across easier and quicker ideas. I chose to sew a crayon roll up for part of her birthday gift. I used some good ole Amy Butler fabric I had on hand and some felt. After a little planning and sewing, I ended up with a little treat that would fit perfectly in a diaper bag or her mom's purse.


I'm pretty sure you could make this without Mr. Sewing Machine. A little hemming tape will do the  trick. What other children gift ideas do you have? Please share!

6/16/11

DIY Sunburst Mirror

I'm back! 
Yes, it has been six days since I last blogged. I was a little busy being wrapped up like a mummy due to a surgery I had on Monday.  Let's just say... I'm glad to be back!

I'm excited to share some progress on our bedroom. I like it more and more each day. I think it's important to love the space you live in. Do you?


Sunburst mirrors are everywhere. 


See this tutorial here.

See the tutorial here.


image Talk about a focal point!


image


Usually, when something is everywhere, I throw the idea out. Well, not this one. You can find sunburst mirrors at about any store right now. Additionally, there are lots of DIY tutorials out there too. I've been debating between a gallery wall of frames or a mirror above our sleigh bed. I decided on the DIY mirror.


I looked everywhere for a round flat mirror. After 3 weeks I found one at Target for $15. For some reason I stopped at Big Lots one day to do some browsing. I found bamboo rods for $4. I made a mental note. (Oh man, I was super impressed with Big Lots that day. If you're looking for temporary items or inexpensive pieces, go look, seriously!) 


Of course, I went back to Big Lots for my sticks. Luckily, I headed home to my parent's house that weekend and my dad was able cut them on his table saw. I believe we cut them 14", 16", and 18" in length. This is the tutorial I used from Isabella and Max Rooms. Isn't her mirror lovely?


I glued, primed, painted, reglued, and repainted some more. My foolish behavior left me scraping paint off the mirror forever. Hint, don't be lazy, cover the mirror before starting! A special thank you to my nail polish remover.


Here's the process...


 Started with longer sticks first.


 Figured out a pattern between the tape.


Martha says to always have an ice bowl when working with the hot glue gun, thanks mom. I thought I was going to prove Martha wrong, but of course....OUCH! 

 Looks like another episode of Dexter over at our place.


 I got smart and covered the mirror.

 Celery color, no thanks!

Best spray paint, Rust-oleum.

 There she is!

Mmmm.


Want to see other ways you can use a sunburst mirror, check out these pictures!


6/10/11

Must Try: Muffins

I'm off to meetings all day. I decided to bake this morning instead of write. These are a must try!


Banana Chocolate Chip Muffins
1 c. sugar
1 egg
½ c. unsalted butter (or margarine)
1 c. mashed bananas (2)
3 T. milk

2 c. flour
1 tsp. baking powder
1 tsp. baking soda
¼ tsp. salt
1 c. miniature chocolate chips
1 c. chopped nuts (optional)

1.        In large bowl, cream liquid ingredients (first 5.)
2.       In another bowl, whisk together dry ingredients.
3.       Pour liquid ingredients into flour mixture.  Stir just until flour disappears.
4.       Fold in chocolate chips and nuts.
5.       Spoon a into greased muffin tin.
6.       Bake in preheated 325⁰ oven for 15-20 minutes or until wooden pick comes out clean

Makes 12.


6/9/11

Lovely Greens


Last year, The Mr. was so thoughtful and took me on a little date to get some flowers and a few pots for our patio as a surprise one spring night. He knew I wanted a garden and he thought this was a great alternative. It was. We also planted green beans, strawberries, and potatoes next to our patio. We enjoyed the flowers and rosemary. The green beans produce enough for us to each have a handful, maybe. Strawberries and potatoes...nodda! Over all, it was fun to have some greens to look at during the summer.

I wasn’t planning on doing any greens this year but when my mom gave me a really cool window box I couldn’t resist.  I wanted to check out a local nursery, Allisonville Nursery. I was very impressed with their huge selection. Even better, it was buy one get one free! I spent most of my time looking at annuals (bloom once). I kept my eye on texture, color, and sun light need. If you're in Indy, I would check them out.

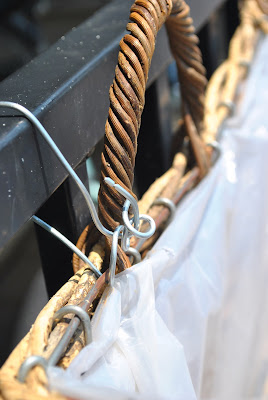
I hung it with some wire I found at Walmart. 


I then refilled it with the soil from the pots from last year. I’m surprised but thankful I saved the dirt. Four bucks saved!


I first laid them out how I liked them. Think in sets of odd numbers for arrangements.


I planted them working from the farthest away from me. I crumbled the bottoms of the plants so they will grow better in their new home. After a little watering, they look like they’re ready to grow.


Let’s hope I can keep them alive!


I've found some other fun un-Walmartish pictures for window boxes. Maybe you'll want to try!


And for window box love...